Do you need fresh goat milk without relying on store-bought options? Mastering the art of milking a goat at home may seem intricate, but with the right approach and equipment, it becomes straightforward and rewarding. Proper tools and techniques significantly enhance your goat farming experience by ensuring a clean and efficient milking process. This step-by-step guide simplifies goat milking, catering to goat enthusiasts eager to improve their skills. Dive into our easy-to-follow advice and transform your daily milking routine into a well-managed and hygienic task, leading to better goat management and superior milk quality.
Necessary Equipment for Milking a Goat at Home
Quality equipment is crucial in ensuring an efficient and hygienic goat milking process. Proper tools not only aid in collecting milk effectively but also help in maintaining the health of the goat by minimizing contamination risks.
- 1-gallon stainless steel milk pail with a snug-fitting lid to keep milk clean and safe from contaminants.
- Strip cup with a fine-mesh strainer to check milk quality and remove debris.
- Stainless steel milk funnel with a metal fitting strainer for filtering milk indoors.
- Iodine for use as a teat dip to prevent bacterial infections.
- Unscented goat milk soap for cleaning the udder and milking area.
- Muslin or clean cloth to cover containers and strain milk particles.
- Containers made of metal or glass for milk storage to maintain freshness and prevent spoilage.
Maintaining equipment hygiene is essential to preventing infections and ensuring the longevity of the tools. Regular cleaning and sterilization of all milking supplies will help maintain milk quality and safeguard the health of both the goat and the consumer.
Preparing Your Goat for Milking
Establishing a routine is fundamental for successful goat milking. Consistency helps both the goat and the breeder adapt to the process, reducing stress and improving milk yield. Conduct milking sessions at the same times each day, ideally 12 hours apart, to synchronize with the goat’s natural production cycle. This predictability fosters a calm environment for the goat, making them more cooperative during milking.
Cleaning and Grooming Techniques
Proper cleaning and grooming are critical to prevent contamination and stimulate milk letdown. Begin by gently washing the goat’s udder and inner legs with warm, soapy water using a dedicated rag. This removes dirt and bacteria, minimizing the risk of infection. Pay particular attention to the teats, ensuring they are clean and dry before milking. Consistent grooming not only maintains udder health but also reinforces the milking routine.
- Approach the goat calmly to avoid startling it.
- Offer treats on the milking stand to create positive associations.
- Speak softly to reassure the goat throughout the process.
- Maintain a gentle touch to prevent discomfort.
- Use the same milking location to build familiarity.
For goats resistant to milking, patience and persistence are essential. Gradually acclimate them to the milking stand by allowing them to explore it without pressure. Encourage cooperation by associating the stand with feeding times. If the goat remains stubborn, enlist the help of an experienced goat handler to demonstrate effective techniques. Over time, the goat will likely adjust to the routine, easing the milking process for both parties.
Step-by-Step Guide to Milking a Goat
Mastering the proper milking technique is vital for efficient milk collection and maintaining the health of the goat. A correct approach ensures a smooth process, minimizes stress for the animal, and optimizes milk yield.
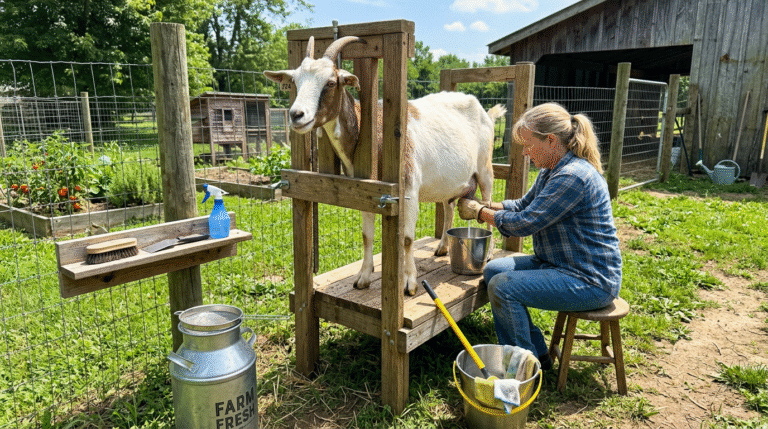
Prepare the milking area: Ensure the space is clean and free from distractions. Gather all necessary equipment before starting.
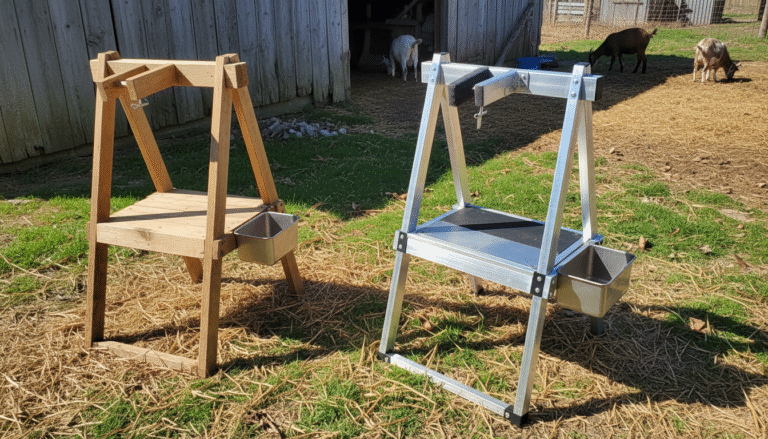
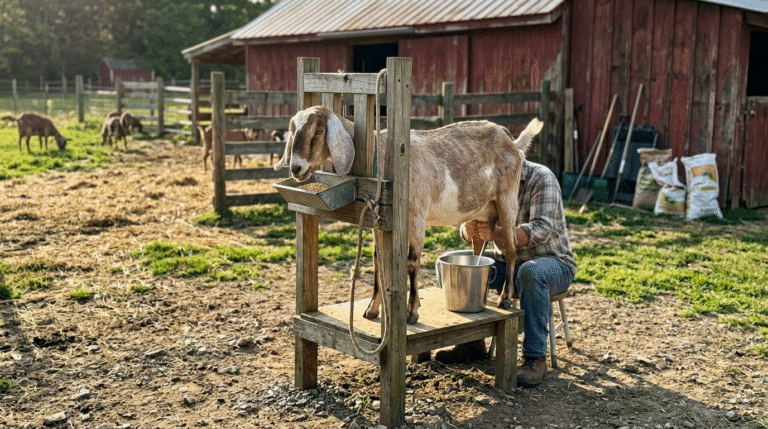
Secure the goat: Use a milking stand or tie the goat to a secure post. Offer a small amount of feed to keep it occupied.
Clean the udder: Wash the udder and teats with warm, soapy water, and dry with a clean towel to prevent contamination.
Pre-strip the teats: Squeeze out the first few squirts of milk into a strip cup to check for abnormalities and clear the milk ducts.
Begin milking: If using hand milking, follow the technique below. For machine milking, see the respective section.
Milk each teat alternately: This ensures even milk flow and prevents discomfort for the goat.
Monitor milk flow: Continue until the flow diminishes, indicating the udder is nearly empty.
Massage the udder: Gently massage to encourage complete milk letdown and ensure no milk remains.
Post-milking teat dip: Use an iodine or tea tree oil solution to dip each teat, preventing bacterial infections.
Clean equipment: Immediately clean all used equipment to maintain hygiene and prepare for the next milking session.
Hand Milking Technique
Begin by pinching the base of the teat with your thumb and forefinger to trap milk. Squeeze downward with the remaining fingers, pushing the milk out through the teat’s orifice. Avoid pulling on the teat, as this can cause injury. With practice, the hand milking technique becomes more efficient and comfortable for both the milker and the goat.
Using a Milking Machine
A milking machine can save time and reduce physical strain. Attach the machine’s teat cups to the cleaned teats. The machine creates a vacuum that draws out milk, simulating a kid’s suckling. While machines can be more efficient, they require an initial investment and regular maintenance. Hand milking is often preferred for small herds due to its simplicity and lower cost.
Goats should be milked twice daily, approximately 12 hours apart, to maintain a consistent supply. Adhering to this schedule helps regulate the goat’s milk production and ensures a steady yield.
Ensuring Hygiene and Safety in Goat Milking
Maintaining hygiene is a critical aspect of goat milking to ensure the safety of both the milk and the goat. Proper hygiene practices help prevent bacterial infections and ensure the high quality of the milk. Cleanliness in the milking environment and equipment, alongside proper care of the goat, reduces the risks associated with consuming raw milk.
- Wash the goat’s udder and teats thoroughly with warm, soapy water before each milking session.
- Dry the udder and teats with a clean towel to remove excess moisture and minimize bacterial growth.
- Dip the teats in a solution of water and tea tree oil after milking to protect the teat openings from bacterial infection.
- Use a strip cup at the beginning of each milking to check for any milk abnormalities and ensure early detection of issues.
- Regularly maintain and clean the milking area to prevent contamination.
Sterilizing equipment is essential to prevent the spread of bacteria and ensure the milk’s safety. After each milking session, thoroughly clean and sterilize all equipment, including milk pails and strainers, using hot water and a suitable cleaning agent. This practice not only extends the lifespan of the equipment but also safeguards the health of the goat and the quality of the milk produced.
Storing and Preserving Goat Milk
Proper storage is crucial to maintaining the quality and safety of goat milk. By using the right methods, breeders can prevent spoilage and extend the milk’s shelf life, ensuring it remains fresh and safe for consumption.
- Use metal or glass containers for storing milk to avoid contamination and preserve flavor.
- Secure muslin or a clean cloth over the container to strain out any particles and keep the milk clean.
- Store the milk at a consistent cold temperature in a refrigerator to slow bacterial growth.
- Label containers with the date of milking to track freshness and ensure proper rotation.
Pasteurization remains a debated topic among goat milk enthusiasts. Some argue for the health benefits of consuming raw milk, which retains natural enzymes and nutrients. Others prefer pasteurization, which involves heating the milk to eliminate harmful bacteria and ensure safety. The choice between raw and pasteurized milk ultimately depends on individual preferences and health considerations.
Troubleshooting Common Milking Problems
Milking goats can present several challenges, particularly for those new to the process. Common issues include variations in teat size and shape, inconsistent milk flow, and the risk of udder infections like mastitis. Each goat may require a slightly different approach, so it’s crucial to adapt techniques accordingly.
- Adjust technique for teat size: Smaller teats may need a gentler grip, while larger ones might require a firmer hold.
- Ensure consistent pressure: Uneven pressure can disrupt milk flow; practice maintaining steady hand movements.
- Monitor milk flow: If milk flow decreases unexpectedly, check for blockages in the teat orifice.
- Keep the goat comfortable: Stress can affect milk letdown, so ensure the goat is calm and relaxed during milking.
Recognizing signs of udder health issues is vital. Look for symptoms of mastitis, which may include swelling, warmth, or hardness in the udder, as well as changes in milk color or consistency. Prompt veterinary consultation is advised upon observing these signs to prevent further complications.
Final Words
Mastering the art of goat milking requires attention to preparation, technique, and hygiene. Starting with necessary equipment ensures a smooth process, while thoughtful preparation of the goat reduces stress and enhances productivity. Employing a well-practiced, step-by-step guide to milking promotes efficiency. Prioritizing hygiene and safe practices, alongside effective milk storage, further optimizes the quality of goat milk. Addressing common milking problems helps maintain the health of your herd. By following these insights, the process outlined in How to Milk a Goat at Home: Step-by-Step Guide can enhance goat care and improve farmers’ overall experience.
FAQ
How to milk a goat for the first time?
Milking a goat for the first time involves positioning the goat on a milking stand, cleaning the udder, and using either hand milking techniques or a machine. Patience and calmness are crucial.
How to milk a goat by hand?
The hand milking process requires trapping milk in the teat using your thumb and forefinger, then squeezing with your other fingers. Maintain a consistent rhythm to avoid discomfort for the goat.
How to milk a goat with a machine?
Using a milking machine simplifies milking by attaching teat cups, which apply gentle suction. This method can be faster and less tiring for those with multiple goats.
How long does it take to milk a goat by hand?
Hand milking typically takes 5-15 minutes, depending on the goat’s yield and milker experience. Regular practice can shorten this time.
Do goats produce milk without being pregnant?
Goats do not produce milk without being pregnant and giving birth. Lactation begins shortly after kidding and continues with regular milking.
How to milk a Nigerian Dwarf goat?
Milking a Nigerian Dwarf goat follows the same techniques as larger breeds. Due to their size, patience and gentle handling are emphasized to reduce stress.
How often to milk a goat?
Goats should be milked twice daily, approximately 12 hours apart, to maintain milk supply and prevent discomfort or health issues.
How to pasteurize goat milk?
Pasteurizing involves heating milk to 161°F (72°C) for 15 seconds, then rapidly cooling it. This process kills harmful bacteria while preserving nutrition.
How to process goat milk at home?
Processing goat milk at home includes straining through muslin into a clean container, quickly chilling, and optionally pasteurizing. Proper storage extends its freshness.
What happens if you don’t milk a goat?
Failing to milk a goat regularly can cause engorgement, mastitis, and reduced milk production. It can also lead to health issues for the goat.
Discover Our Products


Our Story
At Goatzy, our story begins on the farm — in the early mornings, with the sound of animals stirring and the promise of another hardworking day. We’ve seen firsthand the challenges farmers face — from caring for animals in unpredictable weather to keeping equipment that truly lasts. That’s why we set out to create gear that works as hard as you do.
At Goatzy, we’re more than just a brand — we’re part of the farming community. We take pride in supporting the people who feed, care, and nurture the world. Our mission is simple: to create dependable, durable, and farmer-approved gear that keeps both animals and farmers comfortable, so you can work better every day.
You Free E-book